I recently needed to calculate a list of CIDR networks for VPN configuration, I came up with the calculator embedded below. Let me know what you think. Everything is stored and calculated locally, nothing is sent back to my server.
Blog
-
Subsurface dive log dive computer downloads from a Shearwater Petrel 1 on a Linux PC
How I managed to get a Bluetooth connection working on Linux (POP OS & Ubuntu).
First things first: make your user is in the
dialoutgroup:sudo usermod -aG dialout $USERLog out or restart for the changes to take effect.
I had no luck with the subsurface bluetooth interface and had to
pair&trustthe device manually throughbluetoothctlbluetoothctlIf you now put your dive computer in bluetooth mode you should start seeing it advertise itself in the console as shown
[NEW] Device 00:13:43:##:##:## Petrel [bluetooth]# [CHG] Device 00:13:43:##:##:## RSSI: 0xffffffc6 (-58) # <-- This is the device we are interested in [bluetooth]# [CHG] Device 00:13:43:##:##:## RSSI: 0xffffffbe (-66)copy the MAC address and enter the following two lines (still in bluetoothctl commandline)
pair 00:13:43:##:##:##You will be prompted to enter a pin (0000).
You should then see something like the following:[bluetooth]# pair 00:13:43:##:##:## Attempting to pair with 00:13:43:##:##:## [CHG] Device 00:13:43:##:##:## Connected: yes [Petrel]# Request PIN code [Petrel]# 1;39m[agent] Enter PIN code: 0000 <--- enter pin [Petrel]# [CHG] Device 00:13:43:##:##:## Bonded: yes [Petrel]# [CHG] Device 00:13:43:##:##:## UUIDs: 00001101-0000-1000-8000-############ [Petrel]# [CHG] Device 00:13:43:##:##:## ServicesResolved: yes [Petrel]# [CHG] Device 00:13:43:##:##:## Paired: yes [Petrel]# Pairing successfulthen enter
trust 00:13:43:##:##:##Petrel]# [CHG] Device 00:13:43:##:##:## Trusted: yes [Petrel]# Changing 00:13:43:##:##:## trust succeeded [Petrel]# [DEL] Device C8:6C:3D:##:##:## C8-6C-3D-##-##-## [Petrel]# [CHG] Device 00:13:43:##:##:## ServicesResolved: noThat’s it, that should be all the command line needed.
- Open Subsurface
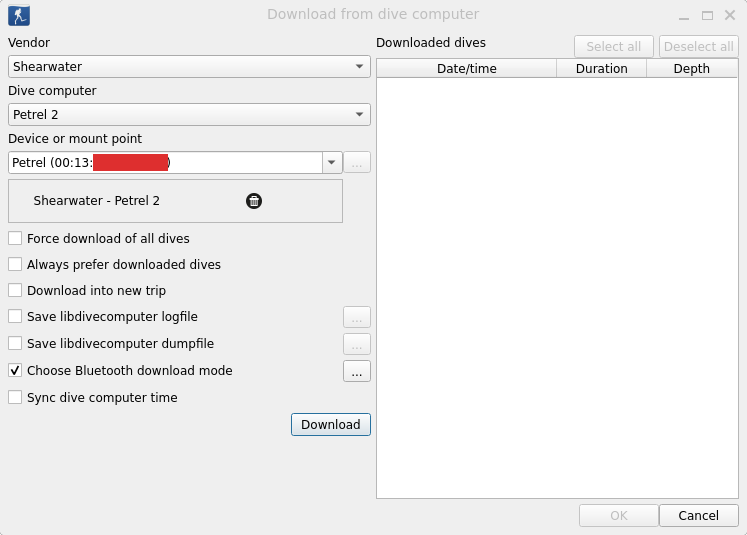
import > import from Dive computerorCTRL+Dto open the import dialog. - Select Shearwater from the manufacturer drop-down
- Select Petrel (or your own computer model)
- Click on the
...next toChoose Bluetooth download mode - you should see the dialog shown below:
bluetooth.src==
bluetooth.src==
bluetooth.src==
- You should now see that the device or mount point field is populated with the correct device. And
Choose Bluetooth download modeis checked. - Click download and new dives should start appearing in the pane on the right.

After this I was able to import dives normally. One quirk I have noticed is that if I merge two dives (short surfacing in the dive) subsurface will always import all segments again if this is the last dive in the log as it doesn’t seem to recognize that they have already been downloaded.
Subsurface dive log is available here for the unbeatable price of free: https://subsurface-divelog.org
- Open Subsurface
-
Dewalt circular saw comparison table
I recently bought a bundle of DeWalt tools and batteries for a very good price so the option of expanding my tool collection with a circular saw seemed quite appealing. I was lucky enough to get a couple flexvolt batteries in the bundle meaning I could potentially get a “pro” grade tool for a reseonable cost. There is a frankly bewildering array of circular saws made by DeWalt. I have tried to compare some key feature in the table below.
DeWalt Circular Saws
Generated by wpDataTables -
WMS and other GIS information resources
Some usefull mapping resources.
JNCC
Resources for UK marine conservation and other marine zones.
Shows chart reporting areas, coastlines and MCZs.
WMS URL: https://mpa-ows.jncc.gov.uk/mpa_mapper/wms
C-Map Chart explorer
Allows previewing C-Maps wonderful high resolution bathymetry ocean maps in a browser (Raster only in the preview).
The android app (Free, with subscription options) has their full vector maps.
Very nice for finding new diving spots around the coastline
URL: https://www.c-map.com/chartexplorer/
Garmin Chart preview
Similar to the previous item allows previewing Garmin and Navioncs’ high resolution bathymetry charts in a browser, while their apps get access to the full vector map data.
URL: https://maps.garmin.com/en-GB/marine/?maps=another-brand&overlay=false
Open Sea Maps
-
OpenStick adventures Part 2: GPS
It would be great if the GPS part of the modem could be used.
Modem manager supports this, and it should be as simple as running the command below:
sudo mmcli -m 0 --location-enable-gps-nmea --location-enable-gps-raw --location-enable-3gppThis command enables NMEA and Raw output as well as the coarse network location derived from the mobile network.
I have yet to acquire any satellite signals.
sudo mmcli -m 0 --location-get ... 3GPP Output cut ... -------------------------- GPS | nmea: $GPGSA,A,1,,,,,,,,,,,,,,,*1E | $GPRMC,,V,,,,,,,,,,N*53 | $GPVTG,,T,,M,,N,,K,N*2C | $GPGGA,,,,,,0,,,,,,,,*66The first line shows that no satellites are available and the rest just confirm that no fix is possible.
The link below shows common NMEA sentences and how to decode them properly.
Maybe I need to find a better location to put the stick and give it longer for a cold fix. The building I am in has thick stone walls and I haven’t found a suitable location for a power supply that has good visibility of the sky. I might try the conservatory over night.
AGPS
Augmented GPS should, in theory massively improve fix times on basic GPS devices. there are two modes of operation MSB and MSA. MSB is a simpler mode where an aGPS server is used to proved network time, this can reduce the time taken to get an initial fix. MSA lets the aGPS server carry out much more of get calculation required. This is provided by fewer aGPS providers.
In my experimentation I was able to enable MSA, but reveived and error when I tried to enable MSB. I am currently not sure whether this is due to a configuration error (URLS and servers) or an issue with my modem.
The flags:
--location-enable-agps-msband--location-enable-agps-msaare used to control this behaviour.When enabling MSB mode I receive the following error:
error: couldn't setup location gathering: 'GDBus.Error:org.freedesktop.ModemManager1.Error.Core.Aborted: Couldn't enable location 'agps-msb' gathering: Failed to receive operation mode indication'Update 2025/01/15
After nearly 24 hours to acquire a signal there is still no change.
I have to assume that the antenna or other parts required for GNSS are not present or configured properly in these dongles. This would make sense if an active antenna is required or additional hardware for such a cheap device, it would have been just too good to be true. -
Openstick Adventures
I recently purchased a selection of cheap LTE dongles that contain the MSM8916 chip (AKA Snapdragon 410). These are available from the usual east asian websites, or for slightly higher prices on local e commerce sites.
They provide a similar compute performance to a raspberry pi zero in a very similar form factor. the primary
Here is an overview of the specs:
I want the companion computer to achieve several things:
- Forward MavLink messages between the ground station and the Flight Controller (FC), securely, either via either wifi (direct) or via LTE.
- Serve as a platform for onboard logic to add higher level functionality to the drone.
- It may be possible to enable the GNSS (GPS) receiver onboard the modem. this could then be used as a backup location source for the FC
There are a couple options for connecting to the FC: directly over serial; if the serial port on the dongle can be used for a purpose other than the default serial console then this would be the most direct and easiest solution. As an alternative to this the dongle support both gadget and host USB modes which could be used to connect to the FC over USB. this would open up other options for USB devices to be used on the drone, such as a webcam.
I initially purchased a single stick which turned out to be a UZ801 3.0 after flashing it with debian and running some benchmarks and failing to get the modem to connect to LTE I decided to purchase a few more to play with and hopefully find one that “Just Works ™”. I ordered a pair of dongles like the first, with one being the same revision as the first and the other a slighly later model 3.2 this is missing the eSIM chip that is present on th earlier version.
Wim van ‘t Hoog has posted the firmware he used for the same purpose and I have used this primarily where I used bookworm: https://wvthoog.nl/openstick/
I also bought a version that includes a screen, I am hoping that this too may be possible to use in linux at some point. I am not entirely sure what the the model of display is.
Feature\Stick Black-1 Black-2 White-1 MF880s Model UZ801 3.0 UZ801 3.2 UZ801 3.0 MF880S Debian Yes (buster & bookworm) Yes (Bookworm) still running stock firmware Not tried WiFi Yes Yes Yes Yes LTE No- Sim enabled, modem enabled, error on registration Yes, fully functional Yes (in stock firmware) Yes (in stock firmware) eSIM N/A Not Tried N/A Not Tried GNSS Not Tried Not Tried Not Tried Not Tried USB HOST Mode Not Tried Not Tried Not Tried Not Tried USB Gadgets Ethernet (default) Ethernet (default) HW UART (other than serial console)
Yes,
SystemD script to disable on successful bootYes,
SystemD script to disable on successful bootYes Security
Once I had the LTE modem working on the second stick I tried installing wireguard. I already have a wireguard network and I thought that adding the stick to this existing private network would be the simplest method to achieve some level of privacy.
Unfortunately although wireguard installs fine through
sudo apt install wireguardthe required kernel module was not compiled in, more specifically it was compiled as a module and I was not able to enable it.A (temporary) fix for this is to install wireguard-go, this is a userspace implementation of the wireguard protocol and plays nice with
wg-quickandwireguardcommands installed.I also configured several WiFi networks so that regardless of which building I am in the stick connects to a known network if possible. it also automatically connects to the wireguard network and displays its status via the blue LED on the stick (rapid flashing for internet connected, slow flashing for wireguard connected). So now I know immediately whether the stick is available on a known private IP.
Update 25/12/24
I have been using some tools from the repo below to configure the system on boot, I have tweaked some values to better suit my needs.
https://github.com/hyx0329/openstick-failsafe-guard
I now have it reconfigure the serial port from a console to the MAVLink port once the succesfull boot has been confirmed.
Update 2025/01/19 (Getting into EDL mode)
There are two methods of getting into EDL mode once the stick as been flashed with debian:
1. Hold the button on the stick for 5 seconds while plugging in. This gets you to fastboot. Then on the host use the commandfastboot oem reboot-edl.2. the other is to short two pads on the stick itself while plugging the device in. This method is fiddly but more reliable if you have really messed up
When trying to restore a backup using the EDL tool. I have encountered an issue where the tool gets stuck with the last message being
main - Device detected :). Rebooting the device into EDL again fixed this issue for me.